Monday, February 3, 2014

Paws Awhile on Fernandina Beach - The Demolition Continues

Lucy and I got up early so we would be ready when the contractor (AKA Handyman Herb) arrived. I covered the sofa with sheets and moved what furniture we could out of the living area because I assumed he would be doing sheetrock work first.

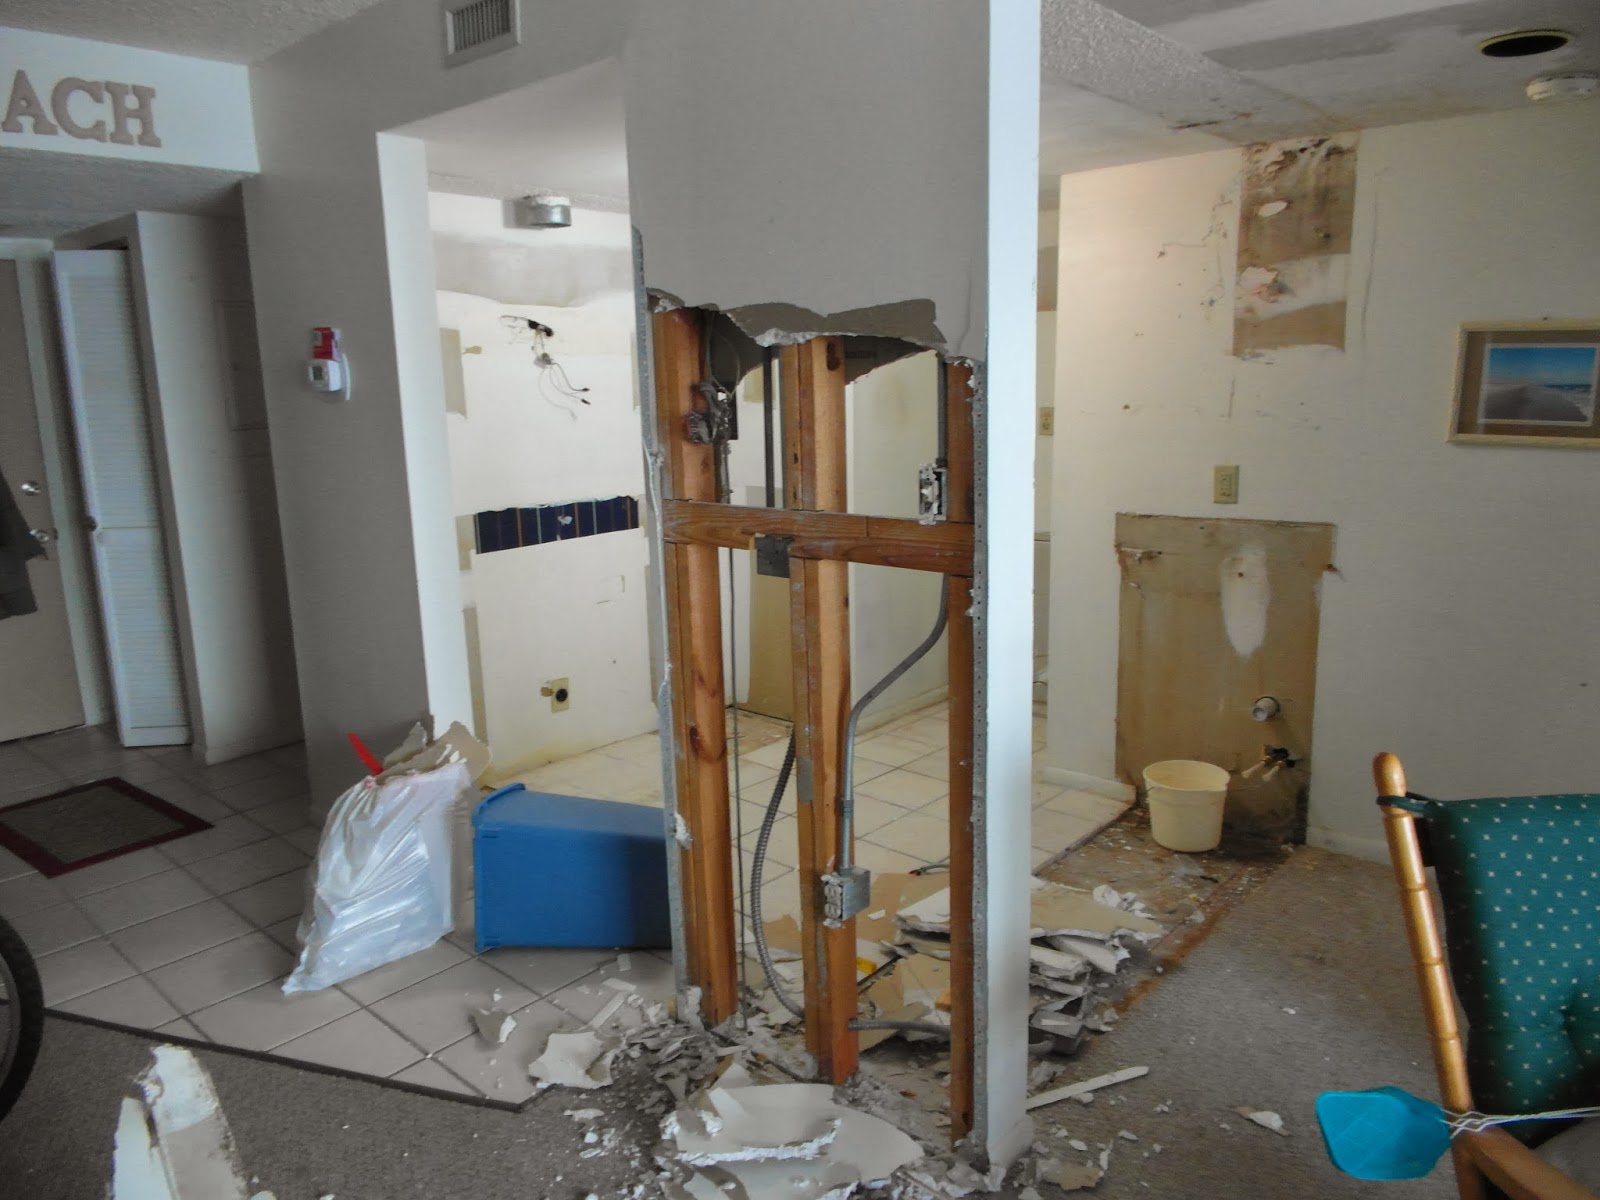
When Herb arrived, he said he had a helper coming to pull up the carpeting so we would need to move all of the furniture out.  While we waited for the helper, Herb started working on getting rid of the unwanted wall.  He had to move all of the electricity from that wall. Some of it, he would terminate in a box in the ceiling and some, he would pull across the ceiling to the other wall, depending on what we needed.

Herb made me feel useful - he let me switch the circuit breakers to help him determine which circuit controlled which wires.

He was able to remove the entire wall, being careful to cut around the phone cable.  Coastal Telecom is coming tomorrow to move it for me so it will be out of the way.
 
Once the helper-bee (John) arrived, we moved the remaining furniture into the master bedroom.  The sofa was too big to fit through the door, so Herb cut one of the legs off.  He assures me he can drill a hole & put a peg in to put it back on.  I'm not even sure we're going to keep the sofa so I'm not worried about it.

We had to get everything into the bedroom and still leave it usable since Lucy and I are planning to stay here tonight. My friend Joyce taught me the term "Lego Packer" and it describes me perfectly.  I am pretty good at assessing the space and making a plan to fit everything together.

While Helper-Bee John worked on pulling up the carpet, Handyman Herb and I continued to identify circuits. We found one "gotcha" with regard to the microwave. It was on a circuit with several of the outlets in the living room. Herb said this was a no-no because the microwave would pull too much electricity so he will pull new wires and put the microwave on a separate circuit.

We found another bit of bad news once the carpet was up. Most of the floor was fiberboard.  This is a big no-no at the beach.  There is just too much moisture. It needs to be replaced with plywood.

Herb had to leave after lunch due to an emergency call from one of his other customers, but he left the John to finish removing the fiberboard and remove the sheetrock from the refrigerator space.

Now we are ready to expand the refrigerator space, which means reducing the closet space, but, as I said before, we are at the beach.  Who needs clothes? Say goodbye to about 3 inches of the right end of this closet.


Just as I was finishing the blog, I heard Helper-Bee John say, "That's not good." I rushed out to see what was wrong. He had parked his truck under the balcony and had been throwing the fiberboard in the back over the side of the balcony. One of the pieces had broken the back window of his truck.


I felt so bad for him. He didn't seem to want sympathy so I decided to make a run to Lowes to get a gift card for Handyman Herb to use to buy the plywood and other supplies. While I was there, Herb called and asked me to pick up some wire. When I got back, John was gone and Herb was back. He's finishing up some of the wiring now.

I'm getting very excited now that things are finally starting to happen! Lucy and I are flying home tomorrow afternoon so I can get my teeth cleaned and my hair cut.  I'm coming back on Thursday but I'm not sure about Lucy.  She doesn't seem to like all of the noise.

I think that's it for today. My phone says it got up to 82 degrees today!!! It was a beautiful day on the beach. Too bad we didn't get to spend much time lounging around.  


Saturday, February 1, 2014

Paws Awhile on Fernandina Beach

We've been searching for a beach home for several years now. Tony says he wants to retire somewhere where he can sit in his wheelchair with a blanket over his lap and gaze at the ocean. I think we're a long way from being ready to sit in a wheelchair, but I do enjoy gazing at the ocean.

Our search for the perfect place started in Ireland in 2006. After a number of trips, we found what we thought was the perfect lot to build on. To comply with Irish building code, we were required to build on the same footprint as the ruins that were on the property. We did a lot of research and were disappointed to find that the price to build a tiny home on the footprint of the ruins was going to be out of our price range.

The next place our search took us was to North and South Carolina. We made one offer on a house near Beaufort, S.C. but could not come to an agreement with the seller.

We have friends who have a home on St. George Island, Florida so our next search led us there. We ended up buying a lot on Carrabelle Beach. That, as it turns out, was a mistake. When we got around to building, we found that we could buy an existing house on the beach on St. George Island for less than what it would cost to build on the lot we already owned - so we did that. We found a short-sale that fit the bill and now we own it. It was costly enough that we needed to rent it to pay the expenses. It was already in the vacation rental program and had quite a following, but we found that we weren't happy with the amount of time we got to use it, and it was a hassle not being able to keep our "stuff" there.

So, we started looking again. This time, we followed another set of friends who have bought homes in Fernandina Beach. Tony had his heart set on building his dream home. Neither of us have ever built a house so this would be new to us. Tony was excited about it but I was apprehensive to say the least. We made an offer on a lot, but during the due-diligence period discovered that it was questionable whether we would be able to build on it due to an encroaching dune. Ultimately, we backed out of the deal and got our deposit back.

We had all but given up when one of our friends told us about a great deal on a condo at the Sand Dollar Villas on Fernandina Beach. We flew down one day, looked at it and flew back home. The next day, we made an offer and it was immediately accepted. Surprisingly, the owners had written on the back page of their acceptance, "Seller to provide a new air conditioning unit."

So, in September 2013, we became the proud owners of what we are now calling "Paws Awhile" on Fernandina Beach! It's small, only 800 sq. ft. with 2 bedrooms & 2 baths. We're not planning to rent it, we we are excited to have a place we can call ours right on beautiful Fernandina Beach.

Its not all roses though. The place was built in the late 80's and has not been updated since, so it needs a little sprucing up.  We set aside the month of January to start remodeling the kitchen and living area. We actually thought we could get the entire remodeling project DONE during the month.  Bahahahahaha!!!

Here's what the place looked like "before".
The kitchen cabinets were old.
The cabinets over the sink blocked
the view of the living space and
made the already small space seem
even smaller.
The first task was picking out the new cabinets and settling on a configuration. This was harder than it seemed. We wanted to get rid of the cabinets over the sink so we needed to add cabinets somewhere else to hold cookware and dishes. We also needed a pantry.

While we worked on the new design, we met with the contractor we had chosen to do the electrical, plumbing, tile and sheetrock work. The contractor would remove the pole at the end of the peninsula cabinet to open up the space.We picked out our appliances but we couldn't find a counter depth refrigerator that would fit the space. Our contractor would move the wall to the right of the refrigerator to widen the space. This would take a few inches out of the master closet, but who needs clothes at the beach?

The contractor couldn't start until February, so that left me with some time on my hands. Tony decided to use the time to go back to Atlanta and go to work. He worked out a routine where he would fly to Atlanta on Tuesday, go to the office Wedinesday through Friday and then fly back to Fernandina Beach again Friday afternoon. Lucy, Lola and I would stay at the beach.

I can't sit still, so the first thing I did was create listings on Craigslist for our old cabinets, appliances and dining room table. Surprisingly, not only did I find a buyer for everything, but he did the tear-out for me as well.


With the kitchen removed, I
had to set up a makeshift
kitchen in the bathroom.
Thankfully the new appliances
had arrived and were stored
in the guest bedroom so we
were able to plug in the
refrigerator and keep
some food around.

Once the tear-out was complete, I got antsy again and started ripping sheetrock from the pole that would be removed. I found that the phone cable that services our unit and the two above us runs right through that pole. We would have to find a solution for that since we wouldn't be able to cut it.


With time still left before the contractor could start, I decided to see if I could remove the old tile floor.  I got the tile out of the kitchen area pretty easily but ran into trouble when I got to the foyer and hallway.


Thankfully Tony arrived in time to help with the remainder of the tile removal. We got reprimanded for being too loud when he started banging with the sledge hammer.


Once we finished the tile removal, there was wallpaper to be removed. Thank goodness for our Wagner Steamer!


Still waiting for the contractor, I contemplated what to do next.  I tried removing some of the old popcorn ceiling but decided that could wait. I couldn't think of anything else, so I decided to tackle some of the furniture. There was a really comfortable glider rocker that had really ugly green cushions on it.


I headed to Jo-Ann's fabric and found something a little more beachy that would match the other furnishings (not that we're going to keep everything).  It took me an entire day to cover the cushions but I was really pleased with the result and I only knocked the sewing machine off of the tray table once!


I have started trying to keep up with my ideas for the remodel on Pinterest.  Here's a link to my Pinterest board if you are interested.  Suggestions are welcome! Fernandina Beach Remodel Pinterest Board

Well, that's all I have to report for now.  Stay tuned!  The contractor is supposed to arrive Monday to start his part of the work.  I sent Lola home with Tony today (he couldn't go home Tuesday this week to work because of Snowgeddon in Atlanta).  Lucy and I already miss Lola.  (Oh, and Tony too).


Sunday, August 18, 2013

Mylar, its not just for balloons anymore!

Who knew mylar was so versatile?  I learned about it at an embroidery conference.  It can be used to give an embroidery project an extra special sparkly "pop" and people will wonder how you did it!  


This project was for a wedding shower.  I really wanted to go to the shower but already had plans to go out of town.  I was trying to think of a special gift to send when I got an email from the bride's mother, one of my very close friends from my college days.  She suggested that I make a garter & pillow for the bride using the design from the wedding invitation. I thought this was a great idea since the invitation was such a cute design.


The heart was easy to digitize and I used one of the built-in fonts to add the text, but it just looked so plain, it needed something.  I remembered taking a class at an embroidery conference where we used mylar.  I had several sheets of it so I decided to utilize it in the project.  I added a circle of stitching using a very open pattern so the mylar would show through.  Once I finished the design, I transferred it to the machine and hooped a piece of white satin.  Over the satin, I placed the sheet of mylar and started stitching.


Notice how the clear mylar starts picking up the color of the thread (purple)?  I finished stitching the design before tearing the rest of the mylar off.


Once I finished the stitching, I tore off the rest of the mylar and saved it for my next project.  Then I finished making the pillow, adding a 1 1/2 inch ruffle to the edge.


I liked it, but it looked kind of lonely so, at the suggestion of the bride's mother (who has great ideas), I made a matching garter.  I tried using mylar but the design was just too small and it didn't look right.


Now my gift is ready!  Hope the bride likes it!


My friend just sent a picture of the bride opening her gift!  I think she likes it!!!


Monday, August 12, 2013

Money Money Money!

Here's another one of my "In the Pocket" applique embroidery designs.  I've had a lot of fun with this one.  I've worn it to Vegas, on tax day, to a house closing and to a charity auction!  I've gotten a number of double-takes.  People enjoy trying to take the money out of my pocket!


To create the design, I took some money out of Tony's wallet and scanned it.  He never missed it, so I didn't see any need to put it back.  :)


I had fun doing the digitizing.  It took awhile to get it to look realistic.  I had to do a lot of samples before I got something I was satisfied with.


This one is pretty simple to stitch out.  There's just one little difference between this and most of my other applique designs.  The satin stitch that holds the applique in place is stitched after the rest of the design instead of immediately after tacking down the applique fabric.  Let me explain.

The first series of stitches is the placement line.  It is sewn on the hooped garment to show where to put the applique fabric.  Then the applique fabric is placed over the placement stitch and the next series is stitched.  This is the tack-down stitch.  Normally, you would trim around the applique fabric at this point, but with this design, I wait to do the trimming until after I have stitched out the interior of the design.


Once the interior of the design has stitched, but before the satin stitch starts, I trim around the applique fabric.


The satin stitch finishes the edge of the applique and then, if desired, the pocket can be appliqued on using the standard applique method, folding the top edge of the pocket fabric to the inside before placing it over the placement line.  After the tack-down stitch, trim away the excess fabric and sew the satin stitch to finish the edge.


There you have it!  Money in your pocket!


If desired, you can just applique the money on an existing garment that has a pocket and skip the appliqued pocket.  This is what I did on my shirt.


This design is for sale in my Etsy Shop.  If you know any embroidery enthusiasts, please tell them about my shop!


Friday, August 9, 2013

A Pocketful of Pens

I really enjoy creating machine embroidery designs, especially applique.  For those of you who aren't in the know about applique, it just means integrating fabric, or really, anything into an embroidery design.  In this design, I use both see-thru vinyl and denim as my applique materials.  It gives the design a realistic look.


Its kind of hard to see it in the picture, but the vinyl is appliqued over the glasses so that light reflects off of them and makes them look real.  When I wear my shirt, people often do a double-take to see what is in my pocket.

The first step is to create the design.  For this one, I used the real items as my pattern. I took a picture of the items I wanted to use in my design and imported the picture into my software.


Then it was just a matter of digitizing the design, something I've gotten pretty good at, if I do say so myself!  I create the shapes and then add the stitches. I have to think about the layering and what parts need to be stitched first, especially with applique.


Next, I write the design to a USB Storage device and load it onto my machine.  I have a BabyLock 6 Needle Machine which I love!  I can use the controls on the screen to position the design where I want it in the embroidery frame.  A little trick I have learned is to push the scissor button to drop the needle and see exactly where the center of the design is on the garment.


With the 6 needle machine, I can load up all of my thread colors so that I don't have to stop and change the thread every time there is a color change.  I try to digitize the designs so that the same colors stitch in the same step, but that is not always possible when layering the designs.

I stitch out the design until I get to the first applique.  See how the earpieces for the glasses have already stitched out, so they will be behind the clear vinyl like a real pair of glasses?  The circle in the center shows me where to put the vinyl.  I stop the machine after this circle stitches.


 Then I cut a square of vinyl a little larger than the circle.  My vinyl has been sitting in a box for awhile so it is wrinkled.  I put it under a piece of denim and iron on top of the denim so I won't melt the vinyl. Then I put my nice flat piece of vinyl over the placement circle. There's no need to secure it - the next set of stitches will do that for me.


 I push the start button and let the machine stitch over the vinyl.  I stop the machine after this stitch is done so I can trim the vinyl.  I use a pair of curved scissors and trim as close to the stitching line as I can, without clipping the stitches (or the fabric underneath).  With this design, I was able to do the trimming without taking the frame off of the machine, but some of my more complicated designs require me to remove the frame.


The next stitches cover the edges of the vinyl and then stitch the placement lines for the pocket.


For the pocket, I used denim. I just folded over the edge to make the top of the pocket, then placed a piece of fabric over the placement lines, matching the folded edge with the top ends of the placement lines. I sew the next line and then trim the denim as I did with the vinyl.


The final step is to sew the satin stitch over the edge of the raw fabric to keep it from raveling.


And there you have it!  A pocketful of nerdy accoutrements!  
Wouldn't this make a fun gift for a teacher, student, or co- worker?  You can put the design on a T-shirt or, leave off the appliqued pocket and put it on a dress shirt that already has a pocket.

I'm selling this design at my shop on Etsy.  If you know any machine embroiderers who might be interested, please pass along the link.

This is what it looks like on my dress shirt!  You can buy the watch design at my Etsy shop too!